Friday, November 26, 2010

Marble NY Cheesecake


I had BIG plans to make a Pumpkin Cheesecake for Thanksgiving to bring to my sisters... just as I was about to start mixing my mom walked in and informed me my sister bought one. Panic, no not me, just break out the cookbook and change direction.

I already had the crust done at that point, and that was already an improvised ingredient. The original pumpkin recipe called for vanilla wafers, I had Girl Scout Trefoils. It turned out perfect. I also used lowfat cream cheese, the other recipe was from Cooking Light, it made no difference in the taste or texture.

INGREDIENTS
Graham Cracker Crust
1 cup graham cracker crumbs (4 ounces, 8 whole crackers, broken into rough pieces and processed in food processor until uniformly fine)
1 tablespoon granulated sugar
5 tablespoons unsalted butter , melted, plus additional 1 tablespoon melted butter for greasing pan
Cheesecake Filling
2 1/2 pounds cream cheese , cut into rough 1-inch chunks and left to stand at room temperature for 30 to 45 minutes
1/8 teaspoon table salt
1 1/2 cups granulated sugar (10 1/2 ounces)
1/3 cup sour cream (2 1/2 ounces)
2 teaspoons lemon juice from 1 lemon
2 teaspoons vanilla extract
2 large egg yolks
6 large eggs

Chocolate Swirl
1/2 cup chocolate chips
1/4 heavy cream

INSTRUCTIONS
1. For the crust: Adjust oven rack to lower-middle position and heat oven to 325 degrees. Combine graham cracker crumbs and sugar in medium bowl; add 5 tablespoons melted butter and toss with fork until evenly moistened. Brush bottom and sides of 9-inch springform pan with most of remaining melted butter, making sure to leave enough to brush pan in step 3. Empty crumbs into springform pan and press evenly into pan bottom. Bake until fragrant and beginning to brown around edges, about 13 minutes. Cool on wire rack while making filling.

2. For the cheesecake filling: Increase oven temperature to 500 degrees. In standing mixer fitted with paddle attachment, beat cream cheese at medium-low speed to break up and soften slightly, about 1 minute. Scrape beater and bottom and sides of bowl well with rubber spatula; add salt and about half of sugar and beat at medium-low speed until combined, about 1 minute. Scrape bowl; beat in remaining sugar until combined, about 1 minute. Scrape bowl; add sour cream, lemon juice, and vanilla, and beat at low speed until combined, about 1 minute. Scrape bowl; add yolks and beat at medium-low speed until thoroughly combined, about 1 minute. Scrape bowl; add whole eggs two at a time, beating until thoroughly combined, about 1 minute, and scraping bowl between additions. Melt the chocolate chips and cream in the microwave. Once you pour the cream cheese mix into the pan, spoon the chocolate mix onto the top of the cream cheese, a dollop here and there. Swirl with a knife.

3. Brush sides of springform pan with remaining melted butter. Set springform pan on rimmed baking sheet (to catch any spills if springform pan leaks). Pour filling into cooled crust and bake 10 minutes; without opening oven door, reduce oven temperature to 200 degrees and continue to bake until instant-read thermometer inserted into center of cheesecake registers about 150 degrees, about 11/2 hours. Transfer cake to wire rack and cool 5 minutes; run paring knife between cake and side of springform pan. Cool until barely warm, 2 1/2 to 3 hours. Wrap tightly in plastic wrap and refrigerate until cold, at least 3 hours. (Cake can be refrigerated up to 4 days.)

4. To unmold cheesecake, remove sides of pan. Slide thin metal spatula between crust and pan bottom to loosen, then slide cake onto serving plate. Let cheesecake stand at room temperature about 30 minutes, then cut into wedges and serve.

Tuesday, November 23, 2010

Peanut Brittle


Well since I invested in that candy thermometer I feel the need to use it, so this recipe caught my eye in Family Fun magazine.

Peanut brittle has long been one of my favorite candies, I remember as a child loving Planters Peanut Bars.

Over the summer while on a long road trip we stopped at a rest stop and bought some snacks, Tim grabbed a peanut brittle. After we got in the car and blasted it open we discovered it stale and old, what a disappointment. That was the last brittle I had so I was hoping that what I was about to make wasn't going to be another let down.

I had all of the ingredients on hand except for the peanuts. I decided to splurge on the peanuts, I love Stew Leonard's peanuts and at $6.99 a can they are a splurge, but I am worth it. The peanuts were also salted, so I just omitted the salt from the recipe.

Ingredients
2 cups granulated sugar
1 cup light corn syrup
1/2 cup water
1/2 tsp. salt
3 cups peanuts
2 tbsp. butter
2 tsp. vanilla
2 tsp. baking soda

Instructions
Heat sugar, syrup, 1/2 cup water and salt to a rolling boil in a heavy saucepan. Add peanuts. Reduce heat to medium and cook, stirring constantly, until syrup spins a thread (265 degrees).


Remove from heat. Immediately add butter & vanilla, then baking soda. Beat rapidly and pour on a buttered surface spreading to 1/4 inch thickness. When cool break into pieces. Store in an airtight container. Makes about 2 lb.


Watch your teeth!

Sunday, November 14, 2010

Disney Autograph Books


If you know me you know I LOVE DISNEY! We usually plan a family trip once a year to Walt Disney World, and I make each of the boys their own albums to get character signatures. They are easy to do.


I use the Cricut Disney Font cartridge and cut the Mickey heads at 4 inches. The cover is about four layers of cardstock glued together, as you can see I personalize each book for the boys with their first initial. On average I have the book about 20 pages, you could get 20-40 autographs in a book if you use both sides. The stitching on the books is just a white gel pen.


You can then take the pages out and incorporate them into your scrapbooking layouts.

Thursday, November 4, 2010

Cannoli Cake


Earlier this week, on election day, my office was bustling with activity. Friends were in and out as we awaited the close of the polls, that's when we get real busy. Now everyone knows that I do alot of baking so one of the guys wanted to know if I could make cannoli's. The light bulb went off, I told him I don't know if I would do cannoli's but how about a cannoli cake. The search was on, I browsed through quite a few recipes and found one on the Sargento website that really caught my eye.

The recipe said to mix the ingredients with a mixer, I have to tell you next time around I will use a food processor. I wasn't that excited about the consistency of the cannoli cream, I felt it should have been smooth, but the taste was spot on delicious.

I also wanted to share some insight to my photos of this cake. Since this cake was a work request I wanted to take the pictures there. My office is not glamorous, my desk is piled with work. We use paper plates and cut with plastic. It was hard to get the cake there and be pretty. I transported the whipped cream separately and opted to frost it at its final destination, that is the real reason for a half frosted cake. Too much mess for my desk.


Cannoli Cake

Ingredients
4 eggs
2/3 cup sugar
1 cup all-purpose flour
1/2 cup (1 stick) butter or margarine, melted and cooled
1/4 cup chopped semisweet chocolate
1 recipe Ricotta Filling
1 recipe Whipped Cream Frosting
Fresh berries or candied cherries, for garnish
Ricotta Filling:
2 cups (15 oz.) Sargento® Part-Skim Ricotta Cheese
3 Tbsp. sugar
1-1/2 tsp. vanilla
1 cup whipping cream, whipped
1 cup semisweet mini chocolate chips
Whipped Cream Frosting:
2 cups whipping cream
2 Tbsp. confectioners sugar
1/2 tsp. vanilla

Directions
Beat eggs and sugar on medium speed in bowl with an electric mixer 5 minutes or until thick. Gently fold in flour and butter; pour into greased and floured 8-inch round cake pan. Bake in preheated 350°F oven 40 minutes or until cake feels firm when touched in center. Cool in pan 5 minutes. Remove from pan and cool completely on wire rack.

To make Ricotta Filling: Beat Ricotta cheese, sugar and vanilla on medium speed in bowl with electric mixer 3 minutes. Fold in whipped cream and chocolate chips.
To make Whipped Cream Frosting: Beat cream on high speed in bowl with electric mixer until soft peaks form. Beat in sugar and vanilla.

Cut cake in half horizontally using sharp serrated knife. Cut each layer in half again horizontally. Place 1 layer on serving platter; spread with one-third Ricotta filling. Repeat procedure, ending with cake layer. No sooner than 6 hours before serving, frost sides and top of cake with all but 1 cup frosting. Decorate with remaining frosting, chopped chocolate and fruit. Refrigerate until serving time.

Helpful Tips
This recipe produces a very dense cake layer. The only leavening is the air incorporated into the eggs when beaten. For best results, eggs should be at room temperature before beating with sugar.


I think Sean enjoyed his cake. Any more requests?

Wednesday, November 3, 2010

Shadow Box


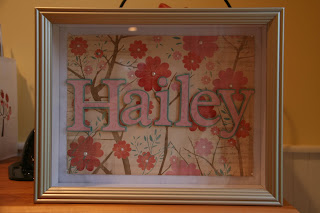
Recently one of Francis' teachers became a grandmother, Miss Tracy has been very dear to us so I wanted to make something special for the baby. I decided to make a shadow box with her name in it.

The plan required going to Michaels to find the prefect frame. The easy part turned out to be not so easy. Originally I planned to buy six small shadow boxes to put each letter in, I couldn't find the package of three shadow boxes that I had seen in the past. So I looked at the rest of the selection which was large but lots of black frames, not real good for a baby, lots of frames that were not well put together. Finally I decided on a brushed antique nickel frame.

I had decided on the paper rather quickly. The paper I choose was pretty but not baby-ish, something that can be kept for years to come.


For the font I went with the Plantin School, the letters are classic. I made the letters with four layers, three layers cut with the shadow option and the top layer regular. The letters are cut at 4 inches, originally I cut a set of letters at 5 inches, what was I thinking, too big. Between layers 1-2, and 2-3 I used foam tape to gave them some definition.

After I assembled most of it I knew I wasted to add some bling, so I opted for pearls in each of the flower centers.